


Image sharpness redefined: Adaptive deconvolution
piccure+ is a reliable choice for photographers for correcting optical aberrations, camera shake and blur from optical low pass filters (OLPF) - three major reasons for a lack of image sharpness. It is the first software solution that actively addresses the problem of copy-to-copy variation in lenses and corrects optical aberrations specifically for your equipment. It integrates seamlessly as a plugin (filter) into Adobe® Photoshop®, Photoshop® Elements and Lightroom®. It can also be called directly from within DxO Optics Pro® and PhaseOne CaptureOne®. piccure+ also works as standalone including RAW converter. piccure+ is developed by a team of professionals (Professors and PhDs) and has been on the market for several years.
Known from:

Download our free 30 days trial
New installers for Photoshop CC2017. On Mac you can simply copy piccure+ from the “old” plugins folder to the new. In Windows you can download and run the new installers after uninstalling piccure+ (control panel). Restart the system after uninstalling piccure+.
No registration required
piccure+ can currently not be purchased
Download piccure+ for Windows (click here)
Download piccure+ for Mac (click here)
View Handbook
Download image samples and step-by-step explanation of how to get the best results (click here) Changelog Version 3 ; ALL inquiries are handled by the founders and/or developers. We DO NOT outsource support to a third world country.Why would a good photographer need piccure+?
“Get good glass and work on your technique and you won’t need any ‘magical’ software.”
– Photographer, random forum
piccure+ was not developed for and is not aimed towards photographers with limited experience or with subpar equipment. In fact, piccure+ was developed for photographers with a lot of experience and knowledge about technology and technique.
Actually, piccure+ has nothing to do with technique but rather addresses the “limits of the technology”. Simply answer the following questions for yourself and discover how technological limitations can cost you thousands of dollars in sharpness:
- Connector.
DOES YOUR CAMERA HAVE AN OPTICAL LOW-PASS FILTER?
Most modern cameras have an optical, low-pass filter deliberately blurring the image to avoid moiré and false color. Irrespective of how good your lens is, the image will never be perfectly sharp.
- Connector.
DO YOU TEST MULTIPLE COPIES OF A LENS PRIOR TO PURCHASING IT?
Modern lenses, particularly complex and expensive designs, exhibit significant copy-to-copy variation. Unless you test several copies of a lens prior to purchasing it, you may end up with “weak optical performance”.
- Connector.
DO YOU CALIBRATE YOUR AUTOFOCUS SYSTEM?
Most camera/lens combinations will exhibit some back- or front-focusing. If you do not micro-adjust your autofocus system for a particular lens, your images may (most likely) not be properly focused.
- Connector.
DO YOU ONLY SHOOT F5.6 OR SLOWER?
At fast apertures, image sharpness quickly deteriorates towards the edges. It has nothing to do with poor technique – but edge-to-edge sharpness is usually only possible around f5.6 or slower. On full format cameras, easily lose 50+% of image sharpness towards the edges. From f6.3 on diffraction often becomes a big problem.
- Connector.
DO YOU SHOOT IMAGES >20 MP?
Most lenses can only resolve up to 20 MP. Diffraction, coma, spherical aberrations, defocus and other aberrations become very visible at 20+ MP. In addition to that, micro-vibrations from the DSLR mirror or passing cars can cause slight blurs (micro-shakes) which cannot be fully avoided.
Learn how to use piccure+ most effectively and efficiently in this detailed How-To by Ross Chevalier
- Connector.
The quality of fine detail sharpening is amongst the best I’ve seen. In many examples, it just looks as if I’m now seeing the limits of sensor resolution much more clearly.
Keith – Northlight Images UK
- Connector.
I found Piccure+ an excellent tool for those of you craving “a greater grip on reality.” It was able to enhance a number of images in my collection that I’d abandoned because the results I could obtain through Photoshop or Lightroom just didn’t live up to my expectations.
Paul Burwell, Outdoor Photography Canada
- Connector.
piccure+ does real math with your original images as they come out of camera to make them sharper and cleaner. There isn’t a serious photographer out there, who cannot benefit from piccure+
Ross, The Photo Video Guy
- Connector.
In practice I found that piccure worked very well, often better and more quickly than the shake reduction in Photoshop CC […] It’s definately a valuable tool to have available in your toolbox
Stan Sholik, Rangefinder Magazine
Fixing Microshakes with piccure+
Ross Chevalier (aka ThePhotoVideoGuy) runs a great blog on photography. He always reviews the latest equipment and trends – and has many special deals listed. Make sure to pay him a visit: Visit Blog
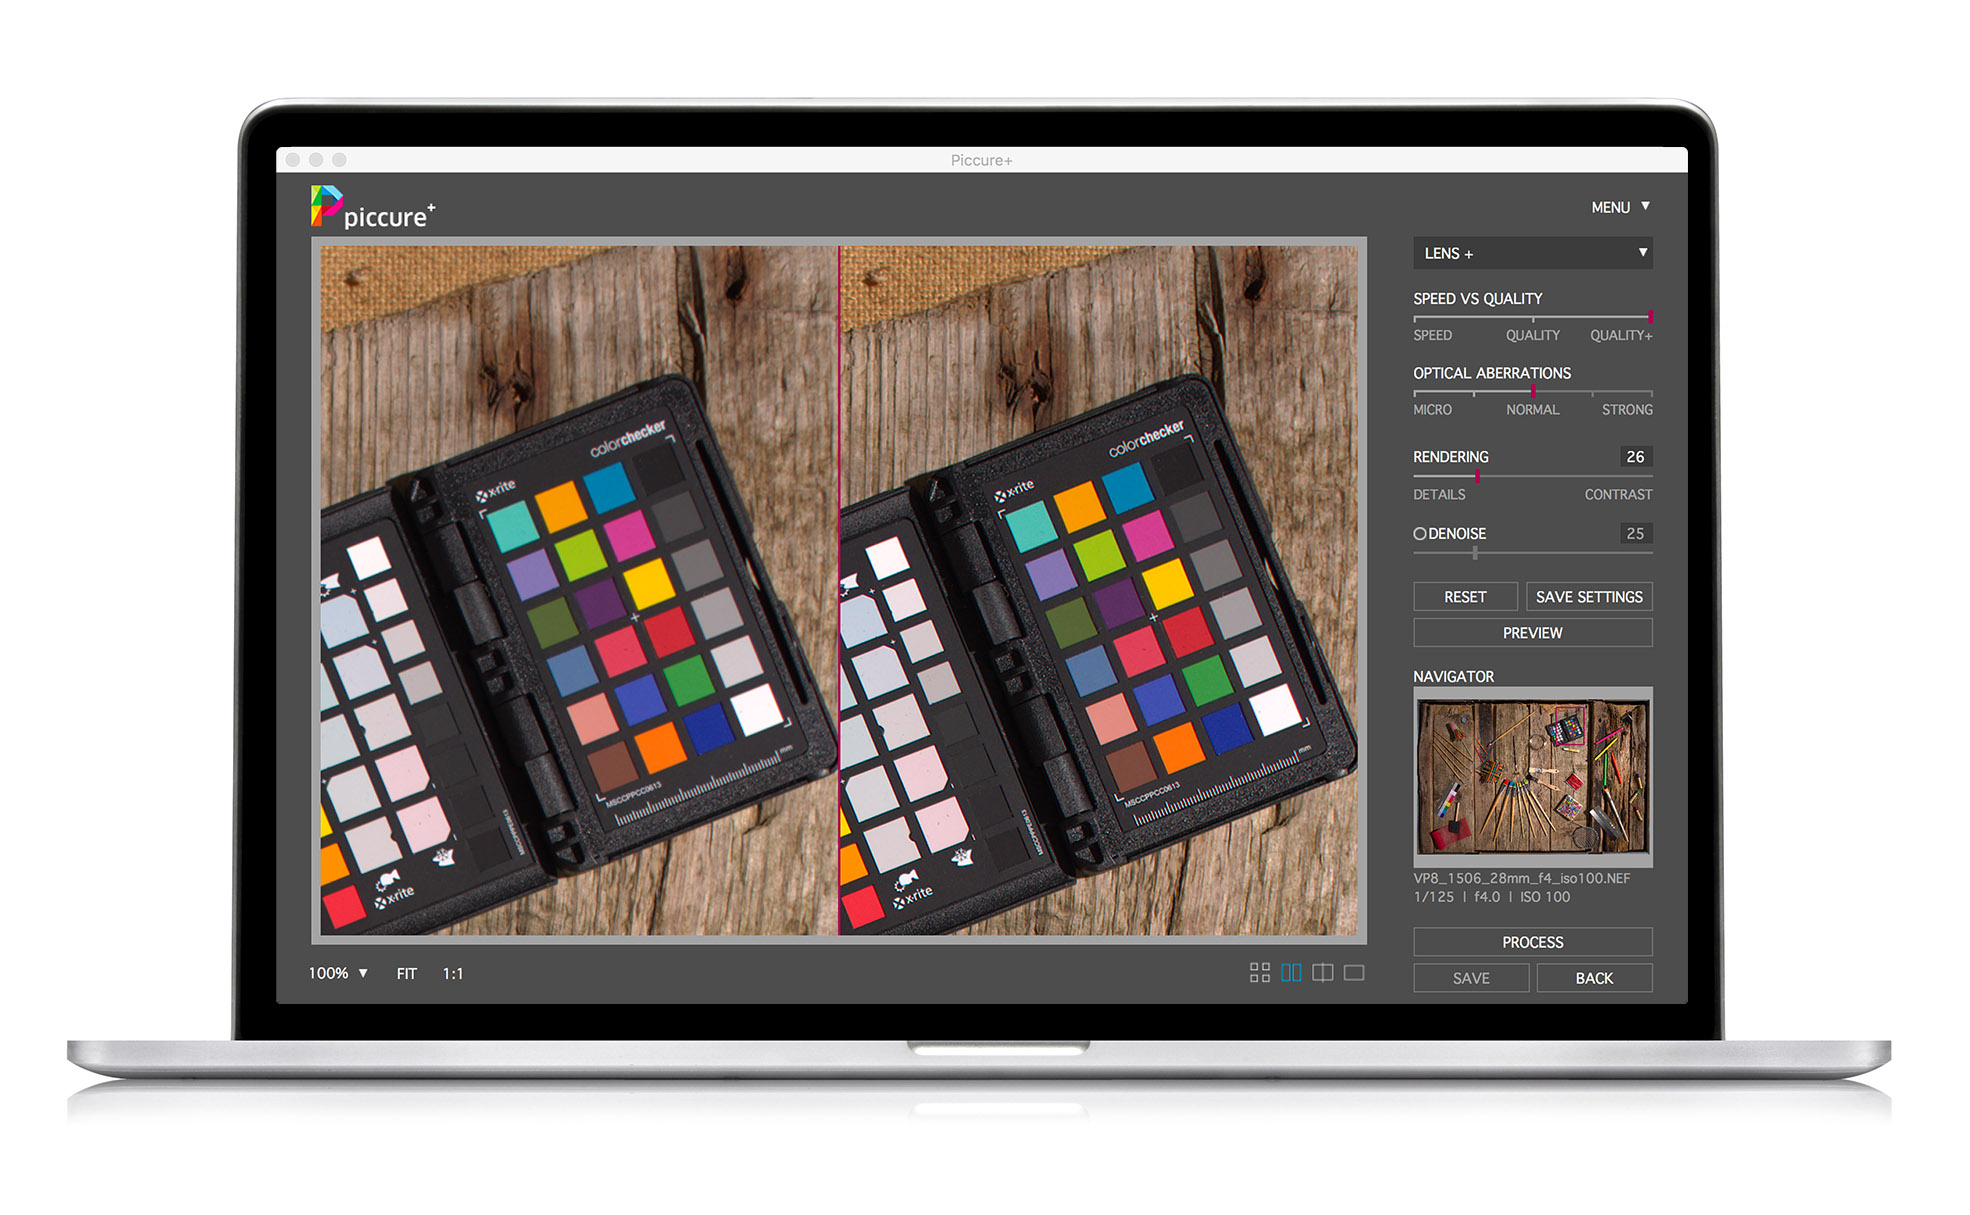
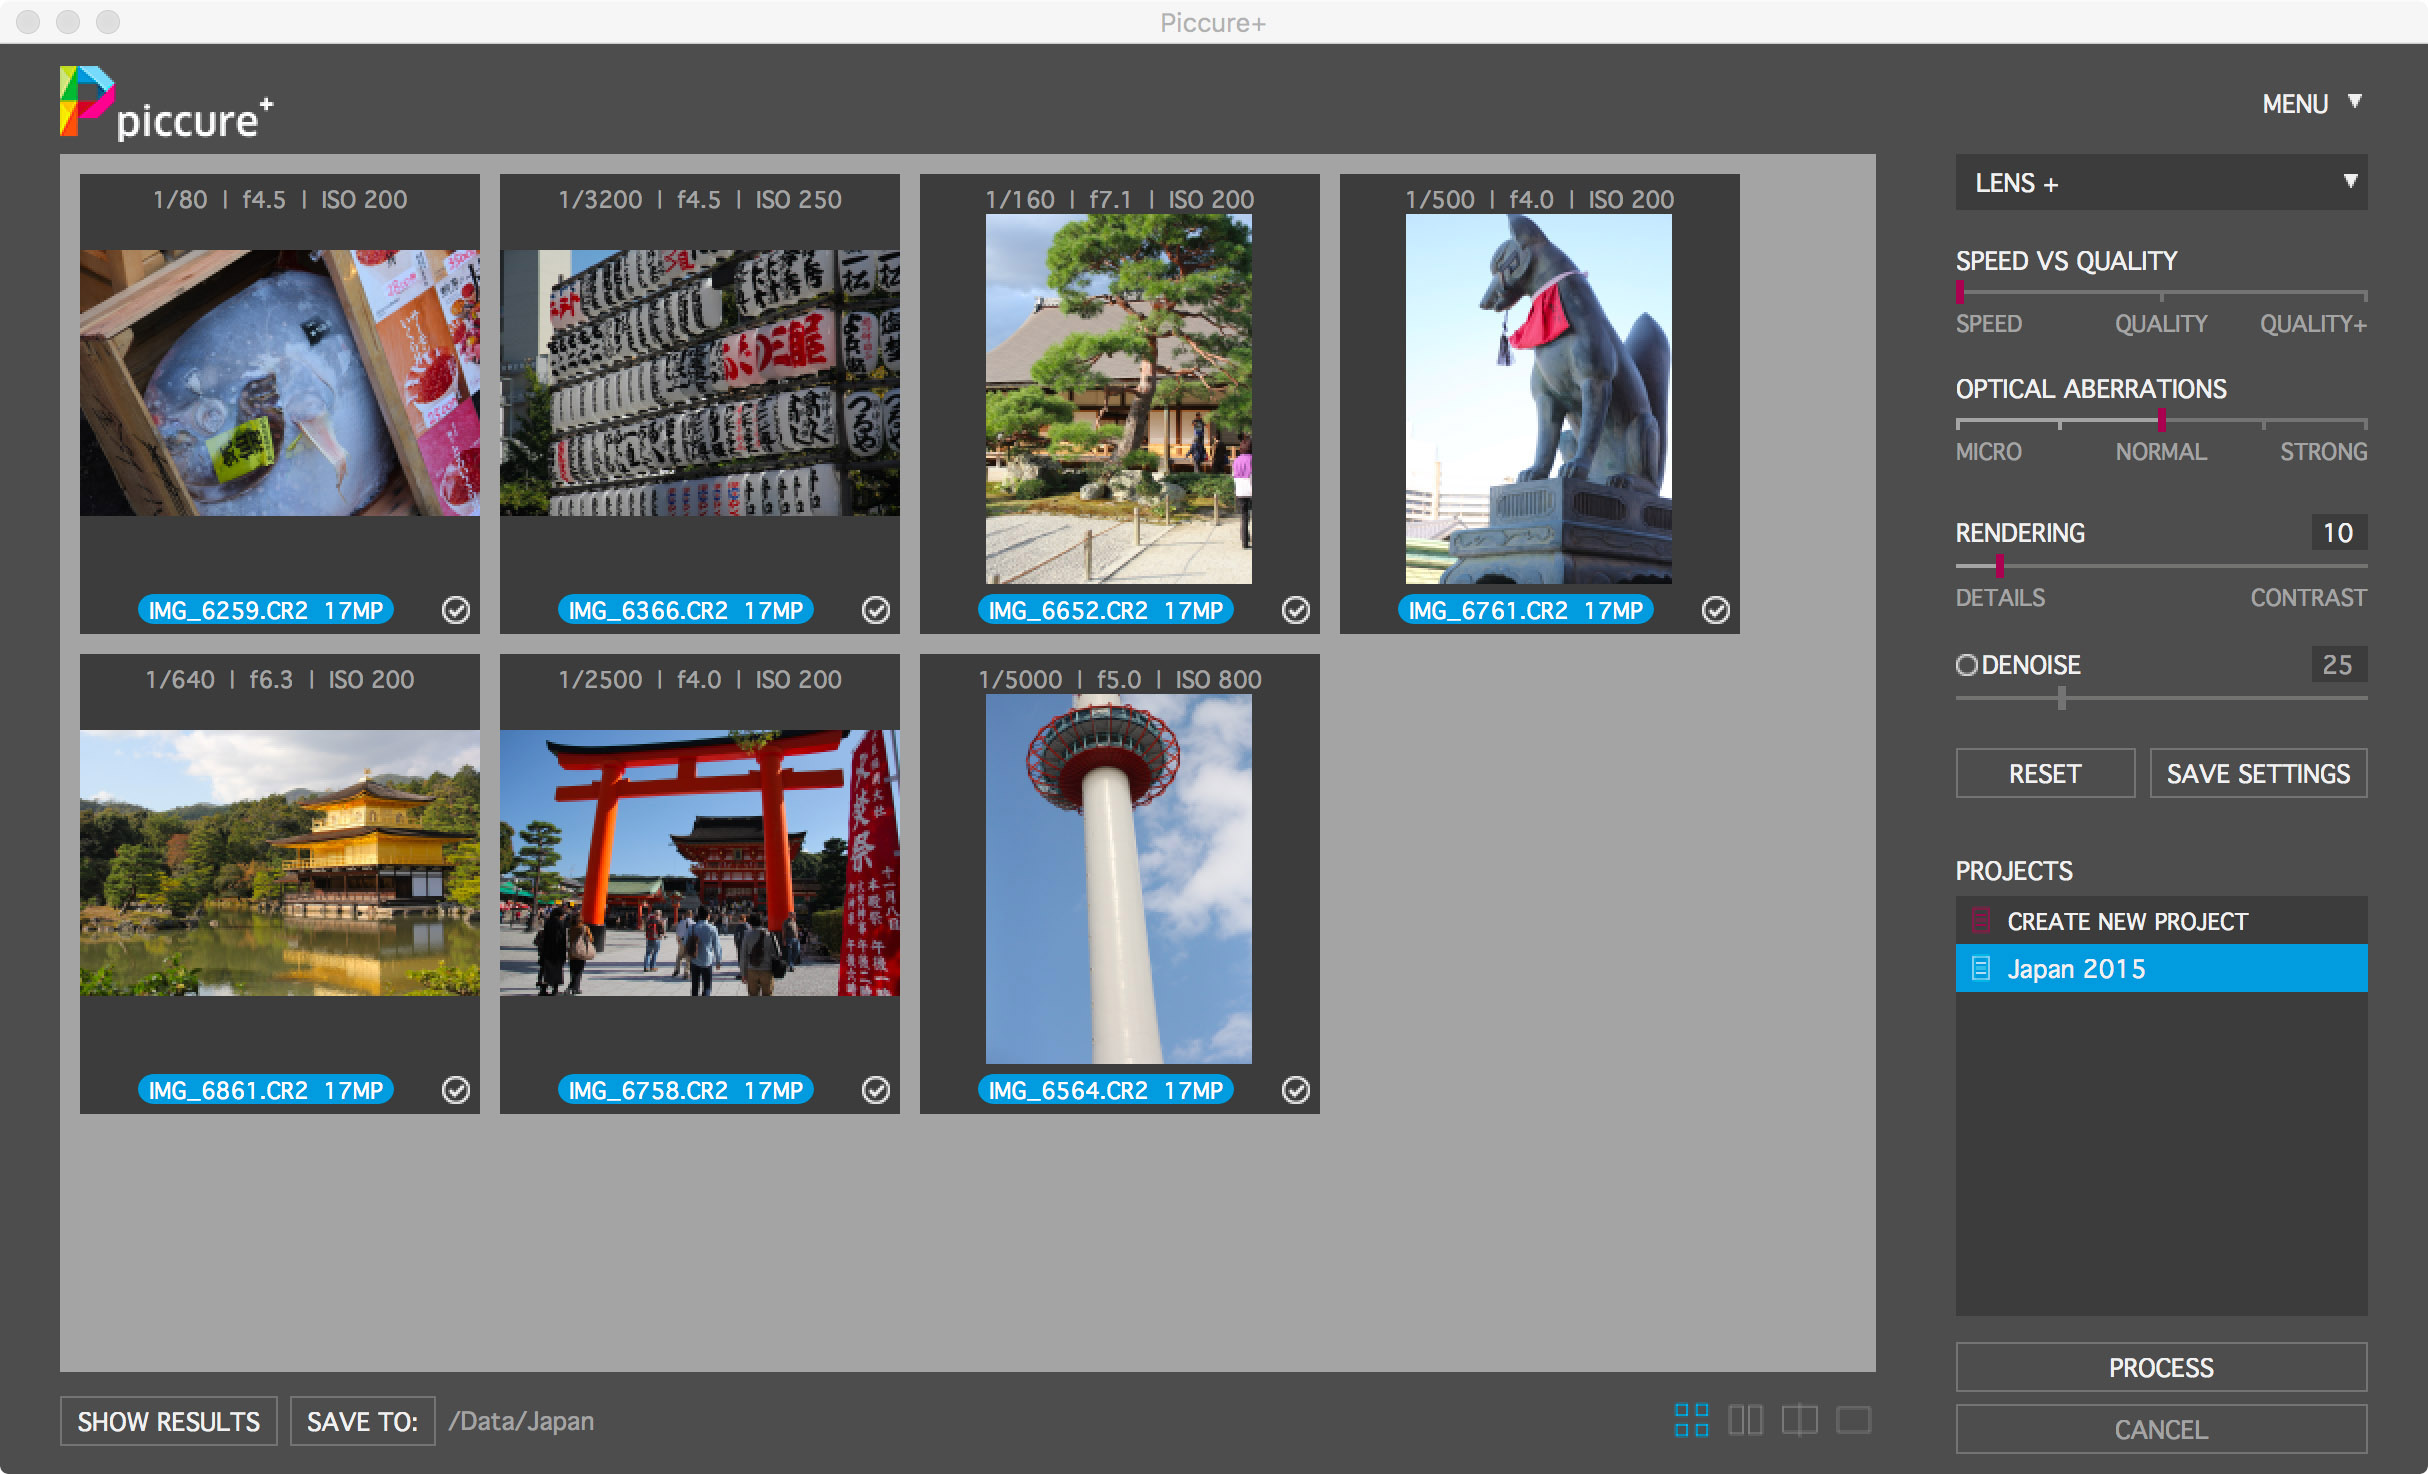
CORRECT OPTICAL ABERRATIONS AND CAMERA SHAKE EASILY WITH A CLICK OF A BUTTON
piccure+ uses a novel method that essentially inverts the optical processes that cause images to look blurry. This novel technology (called blind deconvolution) is built into a reliable program and maintained by professionals with several years (decades) of experience. With the help of piccure+, your equipment can now be upgraded with the click of a button. In addition, piccure+ is the first program that actively addresses the problem of copy-to-copy variation in lenses. piccure+’s adaptive algorithms correct optical aberrations individually for each lens and do not rely on lens profiles. We highly recommend Roger Cicala’s article on quality assurance and lens-to-lens variation. Complex lenses suffer from variation. Click here (external link) to find out more. piccure+ is useful for both expensive fast lenses as well as for economic zoom lenses. The improvements get more substantial with increasing image size since many lenses cannot match today’s sensor resolution of up to 36 or even 50 megapixels. Only with the latest and best lenses, and ideally with a camera mounted on a tripod, will photographers directly benefit from these large sensor resolutions. In all other cases, piccure+ can help you make full use of your sensor. piccure+ also addresses the lack of sharpness caused by built-in optical low-pass filters (OLPF).
piccure+ can help you do the following:
• Counter lens softness for any lens/camera combination, particularly at open aperture.
• Counter varying degrees of sharpness across the image (level sharpness).
• Counter slight camera defocus (e.g. if you did not micro-adjusted your autofocus).
• Counter lens-to-lens sample variation—don’t worry whether your lens is as good as “the others”.
• Counter diffraction.
• Counter the effects from optical low-pass filters (OLPF).
• Counter the effects from micro-shakes.
FEATURES
- Connector.
Lens+ engine
Lens+ is a novel, real world feature that is revolutionizing image sharpening. Thanks to a sophisticated set of algorithms and the latest deconvolution routines, it is now possible to correct images for lens softness and chromatic aberration—the most common errors that affect image sharpness. Lens+ recreates a virtual flawless lens, estimates the optical aberrations, and reverses their effects. Your pictures will thus become significantly sharper. It also addresses the decrease of sharpness caused by optical low-pass filters (OLPF). piccure+ gives ALL your lenses a nice upgrade and (unlike most other investments) does not render your current equipment obsolete.
- Connector.
Motion+
Motion+ gives photographers the ability to account for camera shake during post-processing. Professional photographers find this feature compelling, especially because micro-shakes can be corrected. The powerful algorithms can correct medium or severe camera shakes.
- Connector.
No Lens Profile needed
piccure+’s innovative approach provides photographers with an important benefit. It allows optical corrections to be made for every lens/camera combination. Even images from less popular digital cameras, analogue cameras, etc. can now be corrected. We don’t charge extra for expensive equipment.
- Connector.
Easy to use, powerful, developed for professionals
A powerful standalone application with an easy-to-use batch functionality and full RAW support is also available—no third-party software is needed. piccure+ also supports a wide range of ICC color profiles and as a result accommodates your needs for color management. sRGB, AdobeRGB, and ProPhotoRGB are fully supported. piccure+ is highly optimized through full multiprocessor support and leverages your CPU’s intrinsic functions. It also provides efficient RAM management. It will not clog up your system and will free up RAM immediately. In Windows, piccure+ leverages Nvidia GPUs (2+ GB) for faster processing. Currently, GPU support is not available for Mac platforms.
- Connector.
Seamless workflow integration
piccure+ fully integrates into your workflow. It works as a standalone as well as a plugin for Adobe® Photoshop®, Lightroom®, or Photoshop Elements®. It seamlessly integrates into the batch functionality of Adobe® Photoshop® and Lightroom®. In addition, it can be called from DxO Optics Pro or PhaseOnce CaptureOne. Leverage our capabilities without altering your workflow.
REQUIREMENTS
- Connector.
Windows
Windows 7 or later
4 GB RAM and Dual-core; 8+ GB, Quad-core and nvidia GPU (>2GB) recommended; - Connector.
Macintosh
Mac 10.9 or later
4 GB RAM and Dual-core; 8+ GB, Quad-core and Retina display recommended; - Connector.
Plugin-Version (Plugin and standalone versions are installed)
Adobe® Photoshop® CS4 (or newer, CC 2017 supported), Adobe® Lightroom® 3 (or newer) or Adobe® Photoshop Elements® 7 (or newer). DxO Optics Pro® 9 (or newer), Phase One Capture One® 8 (or newer)
Don’t lose 40-80% of your sensor resolution to lens softness
piccure+ is primarily aimed towards professional photographers shooting 20+ MP RAW images. However, many photographers don’t know that they lose 40–80% of their sensor resolution to lens softness caused by optical aberrations or optical low-pass filters. Even the latest lenses often cannot match the resolution of modern camera sensors. DxO Labs (famous for their camera and lens tests) evaluated many of the most recent Nikon lenses with the following results (sensor resolution vs. Perceptual MPix). In addition, most high-res DSLRs use an optical low-pass filter (OLPF) to reduce anti-aliasing and moiré effects, which can reduce image sharpness quite significantly. In the end, not much of your camera’s 50/36 MP may be actually left.
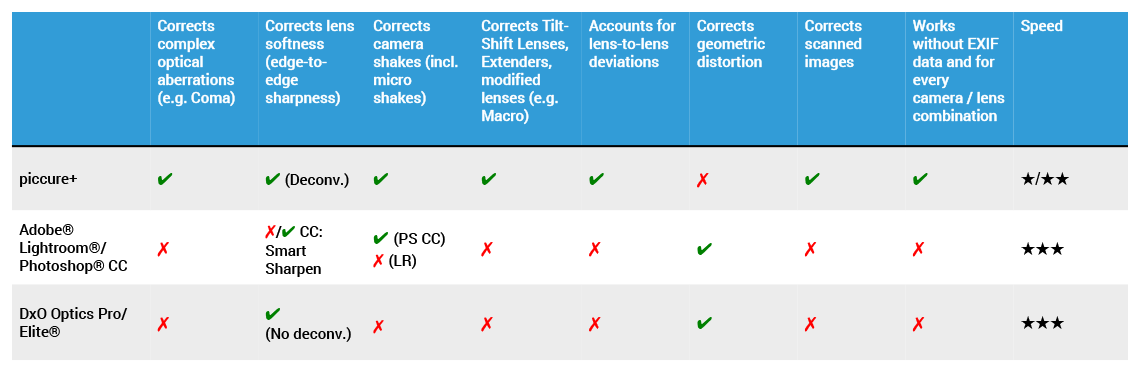
How is it any different from the competition?
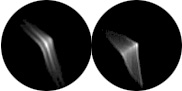
There are two main differences: 1) piccure+ fixes errors specifically for the image at hand. There are significant copy-to-copy variations in both lenses and camera bodies. This limits the effectiveness of “lens profiles” that are specific to your lens model, but not to the actual lens you have, let alone to your camera body. 2) piccure+ uses a process called deconvolution to reverse the blur. This is much more complex than the classical “unsharp masking” operations and can correct complex blurs (e.g. coma or spherical aberrations). It’s extremely difficult to do well.
We highly recommend Roger Cicala’s article on quality assurance and lens-to-lens variation on this topic. Click here (external link) to find out more.
piccure+ complements your existing tools
It may appear that piccure+ aims to replace your Adobe® Lightroom®, DxO Optics Pro®, or Adobe® Photoshop® software solution since all promise a lens-correction module. But piccure+ has different strengths, and although it can be run in standalone mode, it also complements the above tools nicely. piccure+ is a highly advanced and market-proven software tool helping professional and ambitious photographers to benefit from the full capabilities of their equipment—and even beyond.
We know that many of you use Adobe® Lightroom®, Adobe® Photoshop® CC, DxO Optics Pro®, or PhaseOne Capture One®. This is why we have optimized piccure+ to integrate seamlessly as a plugin to ensure that your workflow changes are minimal. piccure+ can even be called directly from DxO Optics Pro® or PhaseOne CaptureOne®. Our handbook provides details on how to integrate piccure+ efficiently into your existing workflow (e.g. Actionscript support). The larger the optical aberrations are, the less useful your current tools will be.
Unlike most investments in photography, this investment will not render your current equipment obsolete. In fact, the opposite is the case. All your lenses and images will receive a significant upgrade that could be worth several thousands of dollars. Our software supports every camera and lens because it does not rely on any lens profiles.
piccure+ works by automatically identifying the optical aberrations of your lens and reversing the effect, thus recovering the image without all the lens softness and chromatic aberrations. piccure+ significantly increases image sharpness. If you are inclined to invest $3,000 in a new lens—hold off and let piccure+ give your old equipment a second chance.
The technology behind piccure+ is completely different from current software solutions. Instead of applying unsharp masks to make an image appear sharper, or rely on lens profiles that may not work well for your copy of a lens, our software solution determines your equipment’s actual optical aberrations and reverses them through a process called deconvolution. NASA has used a similar technology to rescue one of their most prestigious projects—the Hubble Space Telescope.
Correct optical flaws
The Lens+ engine determines a “virtual lens” for each image—the optically flawless version of the lens you used and reverses the effects of lens softness and chromatic aberrations. With sophisticated deconvolution routines, similar to the ones used by military and space agencies, significantly better images can be achieved. The Lens+ engine can also detect blur caused by optical low pass filters (OLPF). OLPFs are used in most high resolution cameras to counter moiré effects but come at costs of image sharpness.
Correct camera shake
The Motion+ engine is an improved version of the world’s first commercial camera-shake-reduction functionality. It not only corrects medium and severe camera shakes, but can also detect and reverse micro-shakes and thus improve image sharpness drastically.
For professionals
piccure+ was developed and optimized for professionals. It works as a standalone with full RAW support or integrates as a plugin for Adobe® Photoshop®, Lightroom®, and Photoshop® Elements. Action scripting is supported, such as ICC color profiles (e.g. ProPhotoRGB). A powerful denoising routine will further improve the quality of the results. You will not need to adjust your workflow—piccure+ integrates seamlessly into your present workflow.
Examples: piccure+ is very versatile
Great for landscape and architecture photographers
Photo by Mihai P
piccure+ is a great tool for landscape and architecture photographers. Not only can you counter diffraction and thus increase image sharpness, you can also reverse the effects from micro-shakes that can affect image sharpness. Micro-shakes can be caused by vibrations of the camera. In addition, piccure+ can correct optical aberrations even from TS lenses. Generally, we recommend the settings “Lens+”, “Micro/Normal”, and “Quality+” for landscape and architecture photography. Diffraction can usually be corrected with the setting “Micro”.

Great for wildlife photographers
Photo by Soren Nielsen
You have been waiting for hours for the perfect shot—and yet it did not come out as crisp as you wish it had. Wildlife photographers face difficult situations. They work with long focal lengths, fast moving subjects, and need to show a great deal of persistence. piccure+ can be a great tool for any serious wildlife photographer. It can counter small camera movements with the camera-shake reduction to get crystal clear shots. You can also correct complex optical aberrations (e.g. color fringing or CA) with the Lens+ module. Shooting with an extender to get the focal length you need? No problem. piccure+ can correct optical aberrations and sharpen your image even when using an extender/teleconverter.

Get it right in macro-photography
Photo by Yvonne Spaene
Macro photographers often modify their equipment to their needs (e.g. reverse lens) or even build equipment by themselves to get as close to the subject as possible. When shooting fast apertures, lens softness can often be a real problem. piccure+ can improve the sharpness of your images with the Lens+ engine by determining the optical aberrations individually for your lens—no calibration is required. We usually recommend the settings “Lens+”, “Micro or Normal”, and “Quality or Quality+”. You may switch on Denoise (e.g. 5–10).

Don’t waste a shot in action/sports photography
Photo by Yaroslav Segeda
You risk everything for the right shot, so you deserve the quality advantage of piccure+. Get the best and most natural sharpness for your images and eliminate all traces of optical imperfection. You shoot with the fastest lenses and with high-resolution cameras—this is exactly what piccure+ was optimized to do.

Get the most out of your scans/vintage images
Photo by Christopher Boswell
Even your scans can be corrected with piccure+. Our software does not need any lens profiles and can cope with aberrations from vintage lenses. Generally we recommend the setting “Strong” and “Quality+” in the “Lens+” mode for the best results if the image suffers from blur.
piccure+ gets the most out of your premium lenses
What is the best lens with a fast aperture worth if you can only use it beyond f5.6? Even though many lenses are real masterpieces when it comes to sharpness around f5.6, ray benders (lens designers) have to fight physics to get decent results at fast apertures. It is not their fault—it’s simply physics. Only through excessive R&D and expensive components is it possible to get “sharp” results for fast apertures. You may have been disappointed how much your premium lenses deteriorate at open aperture; however, with piccure+ you can now get the quality you really deserve. It is the most advanced tool in computational photography and delivers the best results for premium lenses at open apertures.
GETTING STARTED IN 3 EASY STEPS
You can consider piccure+ as a “RAW converter with extended sharpening capabilities”. We always recommend putting it at the beginning of your workflow. There is a detailed handbook available (Menu/Handbook), which you can download from the Download section.
1. DOWNLOADING AND INSTALLING PICCURE+
Go to the top of this page and download piccure+. After the download, you will need to install the program. Usually the software will download into the default “Download” folder. If you cannot find the downloaded installation, search for “piccure” in your Finder (Mac) or Explorer (Windows). In some cases, your browser may prohibit you from downloading a program from the Internet. In that case, please check your browser settings.
> In Windows, please close all Adobe programs prior to installing piccure+. In addition, make sure you are logged in with Administrator rights.
> If you’re on a Mac, you will need to double click on the downloaded program. This will cause a new drive to be mounted. Go to that drive (it will be on the left side, right below your hard drive in the Finder window). Double click on the file piccure-a3.mpkg, and follow the instructions on the screen.
2. RUNNING PICCURE+
Standalone
If you are using a Mac, run piccure+ by opening the program in the Applications folder. The standalone application is called piccure+.
In Windows, you can run piccure+ by clicking on Start/Programs/piccure+/piccure+.
The standalone application is capable of processing RAW images as well as processing batches of images. We recommend using the standalone version if you have a large number of images to process and would prefer to have the images processed overnight.
Plugin
Run Adobe® Photoshop®/Lightroom® or Adobe® Photoshop Elements®. Open the image you would like to correct. Then select Filter/Piccure+/Run piccure+.
In Lightroom®, click Photo/Edit in/Piccure+ and save the current photo as a copy, ideally TIFF 16-bit.
3. PROCESSING IMAGES WITH PICCURE+
Standalone
Simply add images to piccure+ by dragging them into the main window. You can choose different processing settings for every image. We recommend you use the default settings (Lens+, Speed, Normal, Rendering 15, Denoising deactivated) in case you are not exactly sure what caused the degradation in image sharpness. Then click “Process”. You may change the target folder for the processed images by clicking “Save as”. All processed images will be saved with the string “_picc” added to the filename into the project folder. By clicking “Process”, you can start the image processing. Once an image is finished, you can double click on the image and compare the result against the original image.
Important: The image will be saved with the extension “_picc” in your project folder (Documents/piccure/Projectname). You can change the target directory on the user interface (bottom left) in the “Batch” mode (four rectangles). The image will be saved in the same image format as the input file (color space, bit-depth, file format, and EXIF information will be preserved).
Plugin
piccure+ will correct the image once you have opened the file in Adobe® Photoshop® or Photoshop Elements®. You can choose different processing settings, but we recommend you use the default settings (Lens+, Speed, Normal, Rendering 15, Denoising deactivated) in case you are not exactly sure what caused the degradation in image sharpness. Simply click “Process” to start improving your image.
Hint: If you are concerned with a specific section of the image (e.g. corners or main subject), we recommend that you zoom into that section and then click “Preview”. The processing will be significantly faster since only that section will be processed. In order to apply piccure+ to the entire image, click “Process”.
Hint: If you get very bad results, choose Lens+, set the Quality to Quality+, set Optical Aberrations to Micro, and the Rendering to 10. Subsequently increase the setting for Optical Aberrations to see if the results improve. Once you are satisfied, you can adjust the Rendering.
FAQ
How do I integrate piccure+ into my workflow?
We recommend using piccure+ at the very beginning of your workflow. Ideally you should import the RAWs through piccure+ or work directly on the imported RAW files. We recommend shooting in RAW since JPG introduces compression artifacts and cameras often artificially sharpen JPGs. We also recommend not applying any cropping and/or adjustment to the brightness, color, etc.
A quick note on using piccure+ in conjunction with other software solutions. This is absolutely no problem. You can pre-process the image before using piccure+ with the following operations:
> Process the RAW file.
> Correct chromatic aberrations (thus saving piccure+ processing time).
> Correct vignetting.
> Correct lens distortion.
> Correct noise with DxO PRIME (several users found the results very good).
Please do not:
> Sharpen the image (e.g. SmartSharpen or “Correct Lens Softness”).
> Crop the image.
What is the best workflow in Adobe® Lightroom® or other programs and how can I apply the geometric distortion correction?
Please see the handbook on “Integrating piccure+ into Adobe® Lightroom®/DxO Optics®” for more information (Handbook).
How can I save the images in the standalone? There is no saving option?
In the standalone version, all images are stored automatically to a newly created project file folder and have the extension “_picc” added to the filename. The location of the folder can be changed by clicking on “Save as” on the bottom left. The “Save as” option will only be available in the Batch mode (when you see the little Thumbnails). RAW files will be automatically converted into TIFFs.
I have a single file. Why can’t I simply click “Save as” in the standalone? What are the projects for? Why do I need them?
The idea behind the standalone program and the projects is that a large number of images can be processed automatically. If you are interested in only processing one image at a time, we would recommend creating one project for all your images (e.g. create a project called “My Images”). Drag images one by one into that project when you want to process them. You do not need to create a new project for each individual image. The resulting image will then automatically be saved in the project folder. Since the standalone version is intended for batch processing large sets of images, you may find the plugin version more convenient for processing individual images.
Why can’t I delete an image from the project list? Do I really need to process them all?
Simply uncheck the box and they won’t be processed. Single images currently cannot be deleted from a project list.
How can I correct chromatic aberrations?
You need to use Lens+ to correct chromatic aberrations. In order to do this, set the “Optical aberrations” to “Strong” and enable “Chromatic aberrations”. The setting “Normal” will not correct chromatic aberrations. If you use the setting “Strong” and enable “Chromatic aberrations”, we also recommend that you set the “Quality” to “Quality+” (see next question). However, generally it is better (and faster) to correct chromatic aberrations during the RAW import.
How can I get the best quality?
“Quality+” gives the finest and most detailed rendering. In most cases, it is sufficient to use “Speed”. The safest option is to stick with “Lens+” unless camera shake is visible. High settings for optical aberrations and camera shake intensity should only be used for problematic images.
Why can’t I select the lens I am using? What lens-profile are you using?
piccure+ does not use any lens or equipment profiles. The optical aberrations and camera movement are determined from the image itself.
Why can’t I correct camera shake properly?
We recommend taking a look at the handbook, particularly, the section on “SmartSpots”. With a little bit of fine-tuning, the images can be improved quite significantly.
Can I correct optical aberrations (Lens+) AND motion (Motion+)?
No. You can correct either optical aberrations or camera shakes.
Troubleshooting
Windows: If the installation fails (e.g. DLL missing) or you can’t see piccure+ in the filter menu, run the installation again, select Repair, and follow the instructions.
Lightroom®: Occasionally after running the piccure+ installer, the software may not be installed correctly in Lightroom®. This may be caused if the Store Presets with Catalog option in Preferences is checked. In order to uncheck this, go to “Edit > Preferences > Presets” OR “Lightroom® > Preferences > Presets”. Then uncheck the correct box.
piccure+ uses sophisticated algorithms that dynamically adapt and does not rely on any profiles or the like. The advantage of this approach is better image quality. Among the disadvantages are less robust image correction, longer computation time, and an increase in digital noise (unless denoising is activated).
While piccure+ allows you to rescue many of your blurry images, it won’t do the trick in the following cases:
> Image is out of focus (similar to the way things look without your glasses)
> Objects are moving within the image, but the camera was steady
> Night shots where only lights are visible
> Noisy images (ISO >1000 – depending on the camera)
> Usually piccure+ will not work very well with images from smartphones due to the compression artifacts
Support
Feel free to send us an email if you have any questions or run into problems. However, we would greatly appreciate it if you took a look at the handbook before submitting a support ticket. The handbook can be downloaded here (Link) or simply accessed through piccure+. To submit a support ticket, please send an email to: .
Adobe®, Photoshop®,Photoshop® Elements and Lightroom® are either registered trademarks or trademarks of Adobe Systems Incorporated in the United States and/or other countries.
 English
 Deutsch
 Français